Tuesday 11 May 2010

Change the On-Screen Size of an Image

Change the On-Screen Size of an Image

You can change the size at which an image displays on your computer
monitor so that viewers can see the entire image. To change the on-screen
size, Photoshop adjusts the number of pixels that make up the image.

Because you lose less sharpness when you decrease an image’s size than when you increase it, consider starting with an image that is too big rather than one that is too small.
1. Click Image.
2. Click
Image Size.


The Image Size dialog box appears, listing the height and width of the image.
3. Make sure Resample Image is selected to change the number
of pixels in the image.
=> Changing the number of pixels changes the on-screen size.

4 Type a size for a dimension.
=> To
resize by a certain percentage, click here and change the units to percent.
=> Select
Constrain Proportions, if it is not already selected, to force the other dimension to change proportionally.
=> You can restore the
original dialog box settings by pressing and holding ALT and clicking Cancel, which changes to Reset.
5. Click OK.


How do I change the size of an image as I am saving it for the Web?

You can change the size in the Save for Web & Devices dialog box.
  • 1 Click File and then click Save for Web & Devices.
  • 2 Type a new value in the W or H field to change the dimensions of your image.
  • => You can also change the size of your image by a percentage.
  • 3 Click Save.

Change the Print Size of an Image

You can change the printed size of an image to determine how it appears on paper. The printed size of an image depends on the number of pixels in the image and the resolution, which measures the pixel density on the printed page.
1 Click Image.
2 Click
Image Size.


The Image Size dialog box appears, listing the current height and width of the printed image.

You can click here to change the unit of measurement.

3 Type a size for a dimension.
=>You can select Constrain Proportions, if it is not already selected, to force the other dimension to change proportionally.
4. Click OK

Change the Resolution of an Image

You can change the print resolution of an image to increase or decrease the print quality.

The resolution, combined with the number of pixels in the image, determines the size of a printed image.

The greater the resolution, the better the image looks on the printed page — up to a limit, which varies with the type of printer and paper quality.
1. Click Image.
2. Click Image Size.


The Image Size dialog box appears, listing the current resolution of the image.
3. Make sure Resample Image is selected to change the number of pixels in the image as you adjust the resolution
You can click here to change the resolution units.


4. Type a new resolution.
=> You can restore the original dialog box settings by pressing and holding
ALT and clicking Cancel, which changes to Reset.
5. Click OK


=> By this technique, adjusting the resolution changes the number of pixels in the image. The on-screen image becomes larger or smaller, while the print size stays the same.

What is the relationship between resolution, on-screen size, and print size?

To determine the printed size of a Photoshop image, you can divide the on-screen size by the resolution. If you have an image with an on-screen width of 480 pixels and a resolution of 120 pixels per inch, the printed width is 4 inches.
How can I use the Measure tool to measure dimensions in my image?

Click and hold the Eyedropper tool and select the Measure tool . You can then click and drag inside your image to measure the dimensions of objects. Click Window and then Info to open the Info panel and see your measurements. You can change the Info panel units in the Units & Rulers preferences.

Crop an Image

We can use the Crop tool to change the size of an image by removing unneeded space on the top, bottom, and sides.
1 Click the Crop tool
2 Click and drag Crop icon to select the area of the image you want to keep.
=> You can also crop an image by changing its canvas size or by selecting with the Rectangular Marquee tool and selecting
Image and then Crop.


3 Click and drag the side and corner handles to adjust the size of the cropping boundary.
=> You can click and drag inside thecropping boundary to move it without adjusting its size.
4 To accept, click Tick icon on the top right of Photoshop or press ENTER button


Photoshop crops the image, deleting the pixels outside the cropping boundary.


Crop and Straighten Photos

You can automatically crop and straighten one or more photographs in a Photoshop image. After cropping and straightening, Photoshop places each image in its own image window. This feature is useful if you digitize several images at the same time on a scanner and want to separate them.

The feature works best when the images to be cropped and straightened contrast with the background.
1 Click File.
2 Click Automate.
3 Click Crop and Straighten Photos.


Photoshop straightens the photos, crops out any blank space, and copies the photos to separate image windows.

The original image remains in its own window.


Trim an Image

You can use the Trim command to automatically remove any blank space surrounding your image. This can be useful for scanned photos or when you want to minimize the file size of an image. Options let you trim space from all four sides, or just some of them.

The feature works best when the image to be trimmed contrasts with the background.
1. Click Image.
2. Click Trim.
=> The Trim dialog box appears.
3. Specify how to select the type of pixels you want to trim

4. Select the areas to trim

5. Click OK.


Photoshop trims the image.


Change the Canvas Size of an Image

You can alter the canvas size of an image in order to change its rectangular shape or to add blank space around its borders.

The canvas is the area on which an image sits. Changing the canvas size is one way to crop an image.

The Crop tool provides an alternative to changing the canvas size. See the section “Crop an Image” for more information.
1 Click Image.
2 Click Canvas Size


The Canvas Size dialog box appears, listing the current dimensions of the canvas.

You can click here to change the unit of measurement


3. Type the new canvas dimensions.
=> You can modify in what directions Photoshop changes the canvas size by clicking an anchor point.
=> You can specify the color with which Photoshop fills any new canvas area if you enlarge a dimension.
4 Click OK.


Note: If you decrease a dimension, Photoshop displays a dialog box asking whether you want to proceed. Click Proceed.


Photoshop changes the image’s
canvas size.

Because the middle anchor point
is selected in this example, the
canvas size changes equally on
opposite sides.

Bắt đầu với Photoshop + Move Tool (V) + Marquee tool (M)

CÁC DẠNG FILE HÌNH ẢNH

  • PG : là định dạng phổ biến cho file ảnh,với định dạng này file ảnh chỉ có một lớp background duy nhất,dung lượng file khá nhỏ nhưng vẫn đảm bảo chất lượng ảnh khá tốt,phù hợp trong xuất bản web và in ấn kỷ thuật số.
  • PSD : Với định dạng này,tất cả các đối tượng trong file ảnh nằm trên từng layer khác nhau thì vẫn giữ nguyên như thế (nếu chúng ta không cố tình gộp các layer lại) nhằm giúp chúng ta dễ dàng biên tập,tuy nhiên dung lượng của file ảnh là rất lớn.
  • PNG : Nếu ta tạo file ảnh với nền background trong suốt,khi lưu file lại với định dạng này thì vẫn giữ được nền trong suốt.Do đó khi mang file ảnh sang chương trình khác để xử lý thì chúng ta chỉ thấy các đối tượng trong file ảnh,phần nền background sẽ bị loại trừ.Trong khi đối với các định dạng kể trên,cho dù chúng ta tạo nền background là trong suốt thì chúng cũng biến thành màu trắng khi lưu.
  • GIF : Định dạng này chỉ sử dụng cho xuất bản web,không thể dùng cho in ấn,dung lượng file rất nhỏ chỉ giới hạn 256 màu.Các file ảnh động cũng sử dụng định dạng này.
THÔNG TIN TỪNG CÔNG CỤ

1. Công cụ Move (V):
=> Dùng để di chuyển đối tượng trong file ảnh từ vị trí này sang vị trí khác.


Nhấp chọn biểu tượng trên thanh công cụ hoặc bấm phím V trên bàn phím sau đó bấm vào đối tượng và rê sang vị trí khác(bấm và giữ

Khi chọn công cụ Move, nếu chọn chức năng Auto select trên thanh tùy chọn, sẽ tự động chọn Layer tại vị trí click chuột.


Note : để di chuyển đối tượng,trước tiên chúng ta phải chọn layer chứa đối tượng đó.


2-Công cụ chọn (Marquee tool) :

Khi xử lý một bức ảnh,nếu không tạo vùng chọn thì photoshop sẽ hiểu rằng chúng ta muốn xử lý trên toàn bức ảnh.Nếu muốn chỉ xử lý 1 vùng nào đó thì ta phải “khoanh vùng” lại bằng một số công cụ tạo vùng chọn.Ví dụ chúng ta có một bức ảnh của một siêu mẫu trông rất hot, chúng ta muốn đôi mắt của cô ấy đen hơn thì chúng ta phải khoanh vùng đôi mắt để chỉnh sửa.

Tại góc dưới phải của công cụ Rectangular có một tam giác màu đen,chúng ta bấm vào đó sẽ bung ra bảng sau:


  • Công cụ Rectangular Marquee (M):

Chọn công cụ Rectangular Marquee bấm giữ chuột và rê trên ảnh,một vùng chọn hình chữ nhật được tạo ra trông giống như “đàn kiến diễu hành”,mọi sự chỉnh sửa ảnh lúc này chỉ có tác dụng đối với “phần bên trong” hình chữ nhật.

Nếu muốn tạo vùng chọn là hình vuông => chọn công cụ,nhấn giữ phím Shift kết hợp với rê chuột.


  • Công cụ Elliptical Marquee :
Cũng tương tự như Rectangular, nhưng tạo ra vùng chọn là hình Elip, khi kết hợp với phím Shift sẽ tạo ra vùng chọn hình tròn.

Khi tạo vùng chọn xong, nếu muốn hủy chọn chúng ta bấm chuột bên ngoài vùng chọn hoặc phím Ctrl-D. Nếu muốn đảo ngược vùng chọn chúng ta bấm phím Ctrl+Shift+I.


  • Công cụ Single Row Marquee :
=> Tạo vùng chọn là một đường nằm ngang. chúng ta chọn công cụ và kích vào file ảnh.
  • Công cụ Single Column Marquee :
=> Tạo vùng chọn là một đường thẳng đứng.

NOTE: đối với công cụ single row single column, mỗi khi chúng ta kích vào hình là tạo ra vùng chọn,khi kích vào vị trí khác thì vùng chọn cũ mất đi,một vùng chọn mới sẽ xuất hiện tại vị trí kích chuột nên muốn hủy chọn chúng ta phải bấm Ctrl-D.


  1. Luôn luôn tạo vùng chọn mới.
  2. Cộng vùng chọn.
  3. Trừ vùng chọn.
  4. Giao vùng chọn.


Tiếp theo là tùy chọn STYLE:


Mặc định của style là normal,nghĩa là chúng ta được phép tạo vùng chọn một cách thoải mái,lớn nhỏ tùy thích, chúng ta rê chuột đến đâu sẽ tạo vùng chọn đến đó.Khi chọn normal thì ô nhập thông số Width;Height kế bên sẽ không có hiệu lực


Nếu chọn style là Fixed aspect ratio thì khung Width Height sẽ có hiệu lực, chúng ta nhập giá trị vào hai ô này,khi đó vùng chọn chúng ta tạo ra sẽ có tỷ lệ chiều rộng và cao như chúng ta chọn.Ví dụ chúng ta nhập thông số chiều rộng (width) là 1 và chiều cao (height) là 3 thì vùng chọn dù lớn hay nhỏ vẫn giữ đúng tỷ lệ rộng/cao là 1/3.


Nếu chọn style là Fixed size (kích thước cố định) thì vùng chọn chúng ta tạo ra sẽ có kích thước cố định theo thông số chúng ta nhập vào ô width (độ rộng)Height (độ cao).Ví dụ chúng ta muốn tạo vùng chọn ngang 10cm và cao 15cm thì chúng ta nhập vào ô width 10cm và ô height 15cm.Khi đó trên file ảnh chúng ta chỉ cần kích chuột là sẽ có một vùng chọn đúng bằng kích thước trên.

Browse for an Image in Bridge

We can open an existing image file by using the Adobe Bridge file browser. Bridge offers a user-friendly way to find and open your images.

In Bridge, we can also add descriptive information to our images and sort them.
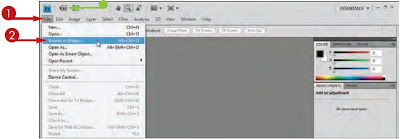
1. Click File.
2. Click
Browse in Bridge.
=> We can also click the
Launch Bridge button


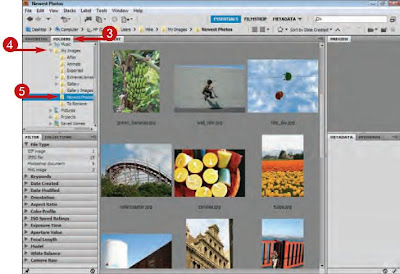
The Adobe Bridge file browser opens.
3. Click the Folders tab.
4. Click
> to open folders on your computer ( > changes to V).
5. Click a folder on your computer to browse.
The folders and files inside the folder appear.


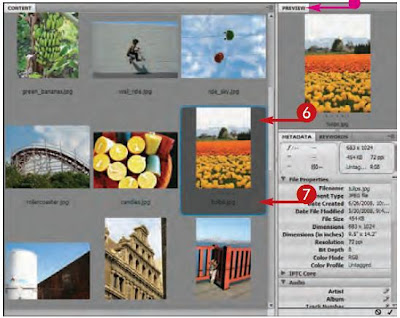
6. Click an image.
=> A preview and information about the image appear.
=> In this example, the right panel has been widened slightly to show more image information.
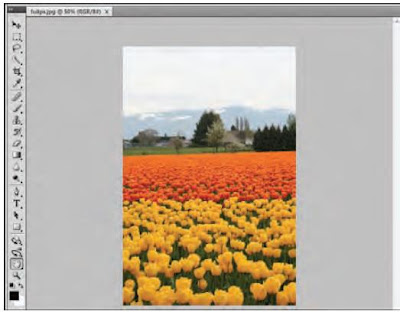
7. Double-click the image file to open it.


The image opens.


Tổng quan về giao diện Photoshop CS4

GIAO DIỆN PHOTOSHOP CS 4


  • Nút “view extras cho phép chúng ta bật/tắt lưới (Grid), đường Guide và thanh thước (ruler) trong file ảnh bạn đang mở hiện hành.
  • Nút Zoom level cho phép phóng to hay thu nhỏ file ảnh đang làm việc
  • Nút Arrange Doccuments cho phép bạn chọn một số cách sắp xếp file ảnh trên vùng làm việc khi có nhiều hơn một file đang được mở trên màn hình.
  • Nút Screen mode để mở rộng không gian làm việc (bạn bấm phím F nhiều lần trên bàn phím sẽ hiểu chức năng của nó).
  • Nút cho phép chọn một số giao diện định sẵn.

=> Thông thường để thuận tiện khi làm việc, chúng ta nên ẩn thanh công cụ và các palette để không gian làm việc không bị “vướng”.Các bạn bấm phím Tab để ẩn toàn bộ và bấm Tab một lần nữa để hiện lại chúng.Hoặc các bạn có thể vào Menu Window rồi kích chọn vào những Panel nào mà bạn muốn hiện hoặc ẩn. Trên đây là một số giới thiệu cơ bản giúp các bạn làm chủ được giao diện của photoshop để dể dàng làm việc về sau.Phần sau tôi sẽ giúp các bạn tìm hiểu một số công cụ của photoshop

THANH CÔNG CỤ

Chúng ta có thể di chuyển thanh công cụ đến vị trí khác bằng cách kích và giữ chuột vào ngay dưới phần màu xám đen trên đầu thanh công cụ và rê đi,bấm vào nút “mũi tên” trên đầu thanh công cụ để chuyển thành dạng “2 cột” hoặc “một cột”.


Giao Diện 1 cột

Giao Diện Sau 2 cột


Thông tin từng công cụ.